The Complete OpenEMR Billing, RCM & Reporting Guide
Understanding and mastering OpenEMR’s billing and revenue cycle management is crucial for any healthcare practice. OpenEMR’s billing module is “deep and complex,” reflecting the intricacies of U.S. healthcare claims processing. In a nutshell, RCM “tracks the payment process from patient scheduling through treatment, coding, billing, and reimbursement”.
A well-tuned OpenEMR RCM workflow can improve cash flow and reduce denials, but it requires careful setup and disciplined processes. This guide walks through every step, from configuring codes and payers to submitting claims, posting payments, handling denials, and running collection reports, with clear mapping to OpenEMR’s menus and modules.
What Is OpenEMR Billing and Revenue Cycle Management?
OpenEMR billing and RCM cover the entire revenue lifecycle, from patient scheduling and registration through coding, claims transmission, payment posting, patient invoicing, and financial reporting.
In healthcare, Revenue Cycle Management refers to this end-to-end process of capturing service delivery and turning it into payment. In OpenEMR, the billing module is a full RCM system:
- For example, it tracks patient demographics and insurance info,
- Applies ICD/CPT codes,
- Captures charges via fee sheets,
- Generates and submits insurance claims,
- Posts insurance/patient payments,
- Issues patient statements, and
- Produces financial reports.
Proper OpenEMR billing setup involves configuring all these pieces up front: importing code sets, defining fee schedules and price levels, entering payers and provider NPIs, and setting user permissions.
OpenEMR Billing Setup and Initial Configuration
Before filing any claims, ensure OpenEMR is properly configured. This means loading standard code sets, entering payer and provider information, defining fee schedules, and granting the right user permissions. Skipping any step will cause claim errors later.
Install and enable code sets
OpenEMR does not ship with CPT or ICD codes pre-loaded.
- Use Administration → Other → External Data Loads to import standard ICD-9/ICD-10 code tables.
- After importing, go to Administration → Lists → Code Types and mark ICD-9 and/or ICD-10 as “Active” so they become searchable in fee sheets.
- CPT/HCPCS codes must be added manually: go to Administration → Coding → Codes, choose type “CPT4” or “HCPCS”, enter the code (e.g., “99213”), active status, description (e.g., “99213 – Office Visit, Established”), and fees for each price level, then save.
- Repeat for every procedure code your practice uses.
Configure the fee sheet
Under Administration → Lists → Services (List Editor), edit the Service categories. By default, OpenEMR has generic headings (“New Patient”, “Established”), but you’ll get better usability by adding categories like “Office Visit”, “Lab”, “Imaging”, “Procedures”, etc.
In Administration → Lists → Price Level, define any pricing levels (e.g., Standard, Medicare, PPO) that apply; each becomes a column on the fee sheet. Grouping codes under categories and price levels helps clinicians and billers enter charges quickly.
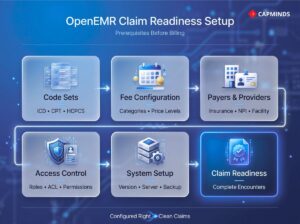
Enter insurance payers and facility details
Each payer (insurance company plan) must have a separate entry.
- Under Administration → Practice Settings → Insurance Companies, click Add for every plan your practice accepts (even if multiple plans are under one insurer).
- Record the name, payer ID, address, and billing contact exactly as the clearinghouse or payer requires.
- In the same area, be sure to set your Provider IDs in Administration → Users, and if needed, add payer-specific NPI in Administration → Practice → Insurance Numbers.
- Also, fill in your Clinic/Facility info (NPI, tax ID, address) under Administration → Facility or Practice; these details populate claims.
Set user roles and access control
Billing tasks should be done by users with the appropriate ACL settings.
- In Administration → ACL, verify that Accountant/Biller roles (or Administrators) have access to Fees, Payments, and Financial menus.
- Likewise, define roles for coders and denials staff if needed.
- Creating RCM-specific roles (Coder, Billing Specialist, Denials Manager) under Administration → Users to enforce separation of duties.
- Proper ACLs ensure only authorized staff can edit charges, post payments, or delete claims.
Verify system compatibility
Use the latest stable OpenEMR, which is ONC-certified and supports PHP 8.x and current MySQL/MariaDB. Always apply updates and back up your database daily. Test changes on a staging copy before going live. Your server should have PHP 7+ or higher and an Apache/Nginx web server.
Completing these prerequisites, code sets, fee schedules, payers, users, and globals, lays the foundation. In OpenEMR terms, you should be able to create a claim-ready encounter, meaning every encounter has all the required billing data.
OpenEMR Revenue Cycle Workflow: From Patient Intake to Claim Submission
With configuration done, follow the RCM steps:
1. Patient Registration, Insurance Verification & Eligibility Checks
Start at patient intake.
- In Patients → New/Search, enter complete demographics and insurance info. Required fields include patient name, DOB, and at least one insurance policy.
- Under the patient’s Insurance tab, add subscriber details (ID, group, relationship, coverage dates).
- These fields feed directly into claims.
- Before the visit, check insurance eligibility if possible: either use a clearinghouse eligibility check (if integrated) or run an Eligibility Report for upcoming appointments.
- (Many clinics generate eligibility reports for tomorrow’s schedule to catch lapsed coverage ahead of time.)
- Proper patient/insurance data entry is crucial – mistakes here (wrong member ID, expired coverage) cause denials later.
2. Charge Capture, Coding and Documentation
During the patient encounter (clinical visit), capture all billable services on the Fee Sheet.
- From the patient’s chart (Patients → [Select Patient]), click the + to create a new encounter if not auto-created.
- At a minimum, set the Visit Category, Date of Service, and Provider correctly (these often auto-fill from the appointment).
- Then go to Administrative → Fee Sheet (or use the Fee Sheet icon).
- Select the correct patient status (New/Established) and encounter type, then add CPT/HCPCS codes for each service performed.
- You can search by partial code or description – the code list reflects what you imported or entered. For each CPT, add the corresponding ICD-10 diagnosis code (using the ICD10 radio button).
- Enter the fee amount (no dollar sign) under the appropriate Price Level column.
- Finally, in the Justify dropdown column, select the diagnosis code that “justifies” each CPT, and ensure the correct Rendering Provider is selected for each line. Click Save when done.
Every encounter you plan to bill must have this complete fee sheet. As the OpenEMR HOWTO notes: “The patient demographics, insurance, and the encounter’s fee sheet all contribute information that must be present and correct to generate a valid X-12 claim file”.
In practice, that means no blank fees, no missing diagnosis pointers, and no empty provider lines. If any field is missing, the claim will fail or be rejected. (The Billing Manager will flag missing info with red text or warnings.)
3. Using OpenEMR Billing Manager for Claim Processing
When it’s time to submit claims, go to Fees → Billing Manager. This screen lists all claim-ready encounters based on the fee sheets you’ve saved. Use the search filters (date range, provider, payer, etc.) to narrow to the claims you want to send. For example, you might filter on Date of Service = “last week” and Provider = “All” to get all charges from that period.
Once the list appears, review each claim line. The columns show Insurance Company, CPT, ICD, Fee, Rendering Provider, and Bill Status. Ensure every row is correct: the CPT and ICD are properly paired, the fee amounts are entered, and the correct insurer is selected. Use the Encounter and Patient buttons on each line to jump back to an encounter or patient chart if anything needs fixing. When satisfied, check the boxes in the “Sel” column next to each claim you want to submit.
Before generating claims, click Clear Log to clear any old messages. Then click Update List to finalize the batch. Now the claims are ready for output.
4. Generating and Submitting Claims
OpenEMR can produce either paper claims (CMS-1500 forms) or electronic X12 files (ANSI 837P).
- Paper (CMS-1500) Claims: In Billing Manager, click the HCFA Form dropdown (on the toolbar). Choose the form format (e.g., “02/12” for the current version). OpenEMR will generate a PDF laid out on a blank CMS-1500 form. Review it, then print it on your pre-printed CMS-1500 stationery and mail it to payers. (Note: older setups required setting Globals for “02/12” to ensure ICD-10 compatibility.)
- Electronic (837P) Claims: To send via clearinghouse, use Billing Manager’s X12 Options → Generate X12 function. This produces an ANSI 837 file containing all selected claims. If your site has the ClaimRev module or an SFTP partner set up, you can upload this file directly to your clearinghouse. After generating the 837P file, go to Fees → Post Payments and click ERA Upload to send it to your clearinghouse, or FTP it if configured. Some clearinghouses allow direct SFTP from OpenEMR.
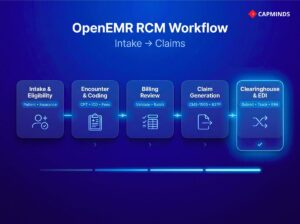
5. OpenEMR Clearinghouse Integration and EDI Submission
OpenEMR supports any ANSI-compliant clearinghouse. Common ones (like Office Ally) charge a fee or not, depending on in/out-of-network payers. During clearinghouse setup, you’ll configure the X12 Partners or EDI settings in Administration → Globals → Billing (enter sender/receiver IDs, qualifiers, etc.) to match the clearinghouse’s requirements. Always use the clearinghouse’s test credentials first.
After submitting an 837, your clearinghouse will process it and send back standard response files: a 999 for file envelope acceptance, a 277 (or 997) for individual claim level rejections/acceptances, and later an 835 (ERA) for payments/denials. OpenEMR’s X12 Tracker or the ClaimRev module can capture the 999/277 status so you can see which claims were received vs rejected. Review the Error Logs (Billing → Claims) to view any rejection codes – these indicate formatting or eligibility problems.
Related: OpenEMR RCM Setup Guide: From Coding to Denials Management
ERA Posting, Payment Processing and Reconciliation
Once payers have processed the claims, you’ll get payments (and possibly patient remittances) that must be posted to open invoices. OpenEMR handles payments either manually or via ERA import.
Electronic Remittances (ERA/835)
Almost all clearinghouses now provide 835 ERA files.
- To apply an ERA, go to Fees → Posting Payments and click ERA Upload.
- Browse to select the 835 file downloaded from your clearinghouse (often via SFTP or their portal).
- Click Upload.
- OpenEMR will parse the ERA and automatically match payments to patient accounts and claims.
Note: OpenEMR will ignore any claims in the ERA that don’t exist in your system, and it won’t allow duplicate ERA uploads. Once uploaded, the payments and adjustments are applied to the corresponding charge lines.
You can review results under Fees → Search Payments (or Payments module) to see how amounts were allocated. Be sure to verify the totals: check that the sum of EOB payments matches the deposit you received. For reconciliation, OpenEMR’s reports (below) can help.
Manual Payments (Paper EOB or Patient)
If you get a paper EOB (or patient pays by check), enter it manually. In Fees → Batch Payments (or Payments), create a new payment:
- Enter the check number,
- Date,
- Payer (Insurance or Patient), and
- Payment amount.
Then allocate the payment to the outstanding charges. You’ll need to split the payment across line-items, entering adjustments and balances. For detailed Medicare EOBs, it’s often easier to use the EOB posting module within Batch Payments to capture approved amounts and adjustments. Once allocated, click Save. The open invoices will now reflect the payment.
Manual posting requires care
Leave overpayments as unapplied credits if needed (and later refund or apply elsewhere). Avoid using “Global” unapplied buckets, since those don’t feed back into reporting. The Search Payment tab allows you to pull up any patient or insurer payments, filter by date/payer, and see which invoices were paid.
Reconciliation
On a regular schedule (daily/weekly), reconcile your posted payments. Compare the Cash Receipts report (Reports → Financial → Cash Rec) to your bank deposits.
This report breaks down income by provider and payment method. If using ERAs, reconcile the total ERA amount to your deposit totals; any discrepancy might indicate an unapplied claim or bank error. Also, use the Patient Ledger or the Open Item Listing report to ensure no claims were left unpaid.
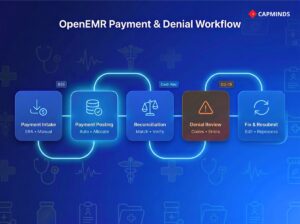
Denial Management and Claim Resubmission Workflow
Denied or rejected claims must be addressed promptly. In OpenEMR, a denied claim simply reverts to the Billing Manager queue for rework.
Finding Denials
In Fees → Billing Manager, use the status filter to show “Denied” or “Rejected” claims. Alternatively, the Denials module (if used) records rejections. Each ERA 835 will indicate denials with reason codes (e.g. “CO-16” – “Claim/service lacks information”). OpenEMR’s Denials Manager (Billing → Denials) can log these automatically. For paper EOBs, mark the claim as denied in its billing record.
Common Errors
Denials happen for reasons such as expired coverage, wrong CPT/ICD pairing, missing modifiers, or inaccurate subscriber data. Common fixes include
- Updating patient demographics,
- Adjusting CPT/ICD codes, or
- Obtaining authorization.
For example, if an ERA denial states coverage lapsed, update the policy dates and re-run eligibility; if it cites “missing info”, check that all required fields (like place of service or provider NPI) are entered.
Correcting and Resubmitting
To fix a denied claim, go back to Fees → Billing Manager, find the claim (using your saved search terms), and click Re-open. This unlocks the claim so you can edit the encounter or insurance details. Make the necessary corrections in the encounter’s Fee Sheet or patient record, then save.
The claim will reappear in Billing Manager as unsent. Include it in your next 837 batch. If resubmitting to the same payer, enter a resubmission code 7 in the claim’s loop 2300/CLM07, and reference the original claim number per ANSI rules. “In either case, you may correct the error and resubmit the claim”. Once a payer finally accepts it, they will return an ERA with the payment.
Tracking
Keep a denial log. OpenEMR’s Billing → Denials feature lets you record denial codes from ERAs (CO-16, etc.) or enter verbal/written denial reasons manually. Categorize them (eligibility, coding, authorization) to spot patterns. And as CapMinds advises, address denials quickly to avoid revenue loss.
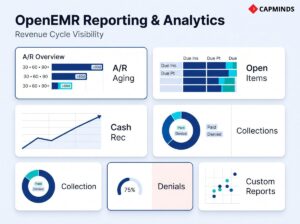
OpenEMR Billing Reports and RCM Analytics
OpenEMR includes several built-in reports for monitoring your billing and collections. Use these regularly to keep the practice on track:
Open Item Listing (Accounts Receivable)
This financial report lists all unpaid charges (“open items”) by insurer or patient for a given date range.
- In practice, run Reports → Financial → Open Item Listing (or use Fees → EOBs search, set Criteria to show Due Insurance) to see aging accounts receivable.
- You can filter by insurer or period (e.g.,> 60 days). This report is invaluable for identifying stale claims.
- For insurance A/R, search for “Due Ins”; for patient A/R, use “Due Pt” (the “Prv” column even hints at how many statements have been sent).
A/R Aging Report
OpenEMR can produce an A/R Aging report by insurer or patient. In Reports → Financial, choose the Aging (buckets) report. This shows total owed broken into 30/60/90+ day categories by payer.
Track your practice’s average days in A/R and watch for big drops after major payment cycles.
Cash Receipts & P&L
Use Reports → Financial → Cash Rec to see payments collected by the provider over time. For more detail, select “Detailed” to break down each procedure collected. The Profit & Loss report (if enabled) compares income vs expenses for a period. Run these monthly. Compare the sum of collected payments (patient + insurance) to billed charges to compute collection ratios.
Collections Summary
This report (also under Financial) summarizes payments and adjustments by payer or by date. It’s useful for reconciling with bank deposits. However, many clinics find the Open Item Listing more actionable for follow-up.
Denial & Clean Claim Rate
Though not a built-in report, track denial rates manually: (Denials ÷ Claims) and (Clean Claims ÷ Submitted) as KPIs. If you log each denial code in the Denials module, you can tally them to see which payers or code sets cause the most errors.
Custom Reports
For advanced needs, use Administration → Reports → Custom Reports (or the Report Editor) to build tailored queries. For example, you might create a report comparing submitted vs paid by insurer, or listing claims held >60 days. Export data as needed for BI tools (Excel, Power BI, etc.).
Regular use of these reports keeps you proactive. Monthly, review A/R aging and collection metrics; compare ERAs to deposits; confirm that the number of 837 claims sent matches the number of claim acknowledgments received. OpenEMR’s reporting may not cover every metric out of the box, but its flexibility (SQL reports, exports) lets you fill gaps.
Related: Using OpenEMR for Clinical Quality Reporting: Tips for MU & MIPS
Common OpenEMR Billing Errors and How to Avoid Them
Even with the best system, billing errors can occur. The top issues in OpenEMR include incorrect patient data, coding mistakes, missing modifiers, duplicate/incorrect claims, system integration lapses, and more.
Below are the 10 most common errors, with causes, examples, and concrete prevention steps using OpenEMR features:
Incorrect Patient Demographics
Errors like misspelled names, wrong DOB, or incomplete insurance IDs lead to denials. Example: An insurer denies a claim because the patient’s name doesn’t match the one on file.
- Prevention: Verify patient data at intake and before claims.
- Use OpenEMR’s patient demographic validation.
- Run an Eligibility Report nightly to catch expired or missing insurance.
- Ensure every new patient form is entered in the Patients menu and includes all required fields.
- Train front-office staff on accurate data entry and regularly reconcile patient charts with submitted claims.
Coding Errors
Assigning incorrect procedure or diagnosis codes causes claim rejection. Example: Selecting 99214 instead of 99213 or an ICD10 code that doesn’t justify the billed service leads to denials.
- Prevention: Keep code sets up to date and use OpenEMR’s coding support.
- Always link each CPT service to an appropriate ICD-10 diagnosis in the encounter.
- Use the Claim Scrubbing & Validation step to catch mismatches.
- Conduct periodic audits of coding accuracy.
- Enable built-in validation, which flags missing or inconsistent codes before submitting the claim.
- Document justifications clearly to prevent “medical necessity” denials.
Missing Modifiers
Omitting required CPT modifiers or using incorrect ones leads to denials. Example: Not appending modifier “25” for a significant unrelated E/M service, or using 50 on a code that’s already bilateral.
- Prevention: In OpenEMR’s Claim Scrubbing & Validation, missing modifiers are identified automatically.
- Train coders to apply appropriate modifiers and use the validation logs to fix any flagged issues.
- For known cases, manually double-check that all applicable modifiers are added.
- Leverage OpenEMR’s ability to store frequently used code-modifier pairs to speed data entry.
- Consult coding guides or AMA resources when in doubt.
Duplicate Claims
Submitting the same claim twice causes insurer denial. Example: A biller accidentally resubmits a cleaned claim because they forgot it was already sent.
- Prevention: Check OpenEMR’s Billing Manager for claim status before resubmitting.
- Use “Search Claims” and “Billing Manager – Search” to confirm if an encounter/invoice has already been filed or paid.
- Maintain a submission log to know what was sent.
- If a claim is rejected, correct and refile it rather than sending a fresh duplicate. OpenEMR’s accounting alerts also signal issues.
Incorrect Payer Information
Wrong insurer IDs, missing payer names, or outdated payer settings cause rejects. Example: Billing to “Blue Shield” when the patient’s plan is actually “Blue Cross Blue Shield” with a different payer ID.
- Prevention: In Administration → Practice Settings → Insurance Companies, enter each payer exactly as required.
- Before claim generation, verify the selected insurance matches the patient’s policy.
- Keep a master list of payer IDs and update them if contracts change.
- If a clearinghouse is used, ensure the payer mapping aligns with OpenEMR’s insurer entries to avoid transmission errors.
Claim Scrubbing Omissions
Failing to run edits before submission can leave errors. Example: Not noticing an empty “subscriber ID” field on a claim.
- Prevention: Always use OpenEMR’s built-in claim validation.
- Before generating the final batch, click Validate in Billing Manager and review the logs.
- The system will flag missing fields or format issues.
- Correct any errors in the encounter or patient record immediately.
- Consider enabling automated pre-adjudication checks via the clearinghouse to catch residual errors.
Clearinghouse Integration Issues
Technical problems with the EDI connection can stall claims. Example: Claims files are not transmitting because the clearinghouse login was changed.
- Prevention: Test clearinghouse uploads regularly.
- In OpenEMR’s X12 Options, ensure the SFTP configuration is correct so that clicking X12 Continue automatically transmits claims.
- If manual upload is needed, verify file formats before sending.
- Monitor OpenEMR’s CLI Logs for error messages.
- Keep contacts for the clearinghouse support handy.
- Document the process so staff know how to handle routine connectivity issues.
Untimely Filing
Submitting claims after the payer’s deadline results in automatic denials. Example: Missing Medicare’s 365-day filing window.
- Prevention: Implement deadline tracking.
- In OpenEMR, use the Open Items report to see submitted-but-unpaid claims by date, and run an A/R Aging report monthly.
- Flag claims approaching filing limits.
- Automated tools or manual calendars should alert billers of looming deadlines.
- If possible, file electronically quickly after service. For late claims, check for possible extensions.
Denial Management Lapses
Letting denials go unanswered erodes revenue. Example: Ignoring a batch of unpaid claims because no one checked the Denials Tracker.
- Prevention: Use OpenEMR’s Denials module or simply record denied claims in the billing notes.
- Generate an insurance A/R aging report to spot non-payments and use the “Search EOB” feature to identify denials.
- Leverage OpenEMR’s reporting: e.g., the denial tracking report categorises denials by code/payer and the dashboard shows denial trends.
- Assign responsibility for timely appeals: document the reason for each denial, correct it in the system, and resubmit.
- OpenEMR’s EOB & ERA processing flags payment discrepancies automatically, streamlining follow-up.
Reporting Gaps
Failing to review reports leads to oversight. Example: No one notices a sudden drop in clean-claim rate.
- Prevention: Regularly run and review OpenEMR financial and KPI reports.
- For instance, use the Cash Receipts and Open Item Listing each month.
- Set up a “Medical Billing Reporting Dashboard” with key charts: open items by insurer, daily claims submissions, denial counts, etc.
- OpenEMR’s built-in dashboards provide visibility.
- Compare the number of claims sent (837s) to acknowledgments received via the clearinghouse.
- Track KPIs like clean-claim rate and denial rate within OpenEMR reports.
- Where gaps appear, drill down with custom reports.
- Ensuring someone is assigned to run these checklists will catch issues before they compound.
OpenEMR Compliance, Governance and Audit Controls
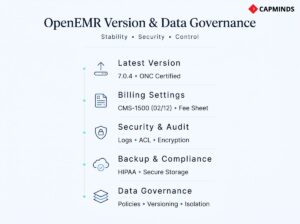
- Using the Latest Version: As of early 2026, OpenEMR 7.0.4 is the current stable release and is ONC-certified. Version 7.0.x brings modern PHP and database support, updated user interface elements, and improved modules. Version 7.0.4 also includes updated code import utilities and security fixes. Whenever possible, upgrade to the latest patch version to benefit from bug fixes and ONC compliance.
- Globals & Form Versions: Check Administration → Globals → Billing for settings. Ensure the CMS-1500 (HCFA) form format is set to “02/12” for current claims. If using UB-04 (837I) for institutional claims, enable that too. Also, verify that the modern Fee Sheet is enabled.
- Audit Logs and Security: OpenEMR keeps an audit log of billing changes if Audit Trail is enabled. Ensure all users have unique logins. Use ACLs to lock down sensitive functions. Encrypt your backups and maintain HIPAA compliance: regularly update the server, use HTTPS, and perform routine data backups (off-site or cloud). Consider running OpenEMR on a secure host, or even disconnect from the internet for a pure local intranet mode if isolation is required.
- Data Governance: Retain backup copies of all submitted claims and remittance files. Document your billing policies. Maintain version control of any custom code. If multiple practices share an OpenEMR instance, use facility/site filters on claims to avoid mixing billing pools. In critical flows, have documented workflows for entering denials and appeals so nothing falls through the cracks.
By keeping OpenEMR and its data well-governed, you protect patient information and ensure your revenue cycle isn’t jeopardized by data loss.
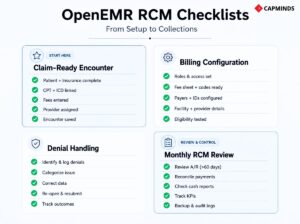
OpenEMR Billing and RCM Operational Checklists
Claim-Ready Encounter Checklist
- All patient demographics are filled (name, DOB, address, etc.), and the insurance section is complete.
- Correct subscriber policy info: ID, group, plan, relationship, coverage dates.
- Encounter created with accurate Date of Service, Visit Category, and Provider.
- In the Fee Sheet, each service has a CPT/HCPCS code entered.
- For every CPT, a justifying diagnosis (ICD-10) is selected.
- All CPTs have a fee amount entered under the appropriate price level.
- The correct Rendering Provider is selected for each line.
- Save the encounter after all entries. (No missing fees or codes.)
Billing Configuration Checklist
- Administrator access: Have an Admin or Accountant role to configure billing.
- Global Billing Settings: In Admin → Globals, set CMS-1500 form type, and enable UB-04 if needed; adjust claim print margins and statement formats as desired.
- ACL Roles: Confirm billing roles (Accountant/Biller) can access Fees, Payments, and Reports.
- Facility Info: Enter clinic/facility name, NPI, address, etc., in Admin → Facility and Practice.
- Providers: In Admin → Users, ensure each provider’s NPI/UPIN/Taxonomy is entered; add any payer-specific IDs in Practice → Insurance Numbers.
- Fee Sheet Setup: Create service categories (Visits, Labs, Procedures, etc.) in Admin → Lists. Define price levels (Standard, Medicare, etc.) in Admin → Lists.
- Code Sets Loaded: Import ICD-10 (and ICD-9 if needed) via Admin → Other → External Data Loads. Activate them under Admin → Lists → Code Types.
- CPT/HCPCS Codes: Add the CPT and HCPCS codes your practice uses via Admin → Coding → Codes, marking each Active and entering fees.
- Insurers/Payers: In Admin → Practice Settings → Insurance Companies, add each plan with the correct Name, Payer ID, and address.
- Payer IDs: For each insurer entry, fill in the correct Payer ID (from your clearinghouse or payer EDI guide).
- Patient Insurance Assignment: Verify insurance on patient charts: subscriber name, ID, group number, plan, coverage dates.
- Test Eligibility: Use your clearinghouse’s test account to send eligibility checks or run an Eligibility Report for upcoming appointments.
Denial Follow-Up Checklist
- Identify Denials: Filter Billing Manager for Denied/Rejected status; or check ERA reason codes.
- Log Denials: In Billing → Denials, record each denial reason (from ERA or EOB), date, and payer.
- Categorize Issues: Determine if denial is eligibility (patient not covered), coding error (wrong/missing CPT, modifier, ICD), authorization, or other.
- Correct Data: Update patient insurance (coverage dates, ID), encounter info, or add missing modifiers as needed.
- Re-open Claim: In Billing Manager, select the denied claim and click Re-open.
- Resubmit Claim: Include the corrected claim in the next 837 batch or print a corrected CMS-1500. If sending again to the same payer, mark it as a resubmission (with appropriate codes).
- Follow Appeals: If the payer still rejects, consider an appeals process or manual review.
Monthly RCM Reporting Checklist
- Run Open Item Listing: Reports → Financial → Open Item (by insurer and patient) to find all outstanding claims. Review >60-day AR.
- Post-Deposit Reconciliation: Compare total payments in OpenEMR (ERA/posting) to actual deposits. Use the Cash Receipts and Bank Deposit reports.
- Age A/R: Run an AR Aging report; note insurance vs patient aging buckets.
- Review Cash Receipts: Reports → Financial → Cash Rec to verify income by provider and payment method.
- Compute KPIs: Calculate collection rate = (Payments Received ÷ Charges Billed). Track denial rate (denials ÷ claims) and days in AR.
- Check Statement Aging: Ensure patient statements have been generated monthly. For any old patient debts, run the “Due Pt” report (Fees → EOB search) to trigger statements.
- Validate ERA Application: Confirm every 835 has been posted. Look for any unmatched claims in the Billing Manager (status remaining “Filed” with no payment).
- Address Denials: Review the Denials log for unresolved issues; schedule any appeals.
- Backup & Audit: Save off a fresh backup of the database. Check audit logs for any unexpected billing changes.
By following this end-to-end workflow and using the checklists, implementers and billing teams can streamline OpenEMR’s RCM processes. The key is thorough data entry, consistent use of the Billing Manager and related screens, and diligent follow-up on rejections.
CapMinds OpenEMR Billing, RCM & Reporting Service
If your OpenEMR billing workflow feels “almost right” but cash flow, denials, and reporting still don’t reconcile cleanly, you don’t need more guesswork; you need an operating model that’s configured, validated, and managed like a production revenue system.
CapMinds delivers end-to-end OpenEMR services like Billing, RCM, and Reporting designed for U.S. payer rules, clearinghouse formats, and audit-ready controls, so every encounter becomes claim-ready, every ERA posts correctly, and every A/R bucket is actionable.
With CapMinds Services, you can operationalize the full cycle:
- OpenEMR Billing Configuration Service (code sets, fee sheets, payer setup, CMS-1500/837 settings, ACL roles)
- RCM Workflow Enablement Service (eligibility → charge capture → billing manager batching → claim submission → follow-ups)
- Clearinghouse & EDI Integration Service (837P generation, 999/277 tracking, ERA/835 automation, partner configuration)
- Denials Management Service (root-cause analysis, rework queues, resubmission rules, payer-specific playbooks)
- Reporting & KPI Service (A/R aging, open items, cash receipts, clean-claim rate, denial trends, custom SQL reports)
- Compliance, Audit Trail & Data Governance Service (HIPAA controls, access separation, change logs, backup validation)
Need help improving clean-claim rate, reducing days in A/R, or building payer-ready reporting? CapMinds delivers these services and more, from implementation to ongoing optimization.